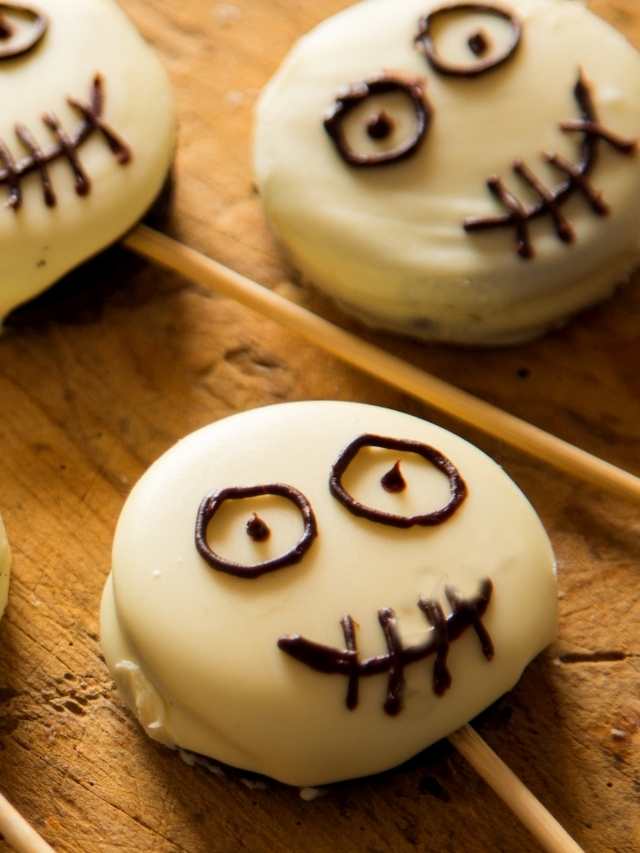
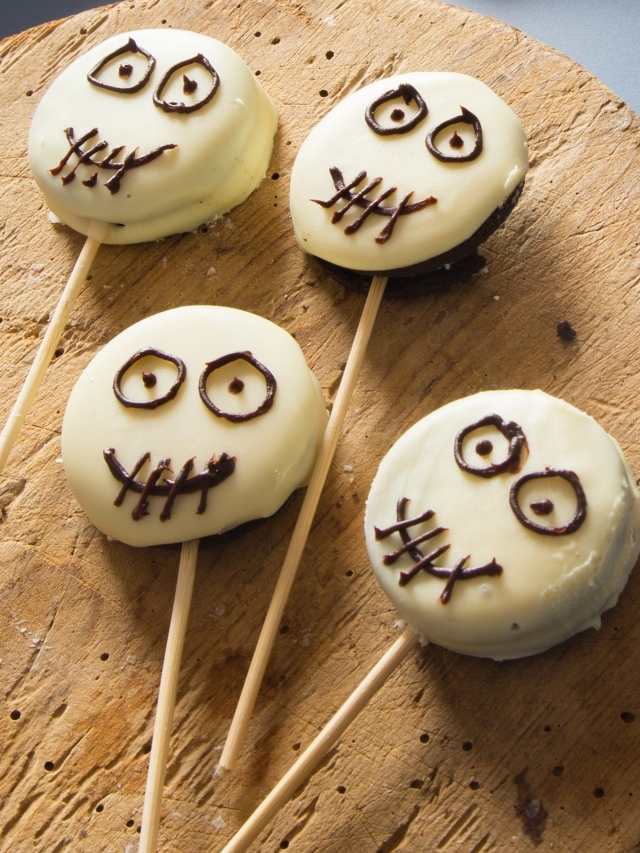
Halloween Oreo Ghost Pops

Look no further than this Halloween Oreo Ghost Pop recipe to add a pop of spooky fun to your Halloween celebration!
Whether you’re a seasoned baker or a novice in the kitchen, these no-bake Oreo pops are a breeze to make.
These Halloween pops are a delightful twist on the classic Oreo cookie.
Easy Halloween Oreo Pops: A Spooky and Delicious Treat
These treats feature Oreo cookies on lollipop sticks, covered in a layer of white chocolate and decorated to look like ghosts.
Here’s the scoop on how to create this Halloween Oreo Ghost Pops Recipe. Get ready to make the best spooky masterpiece, step by step.
No-Bake Oreo Halloween Pops
Ingredients:
- Oreos cookies
- Lollipop sticks
- White chocolate candy melts (we use Wilton)
- Candy eyeballs
- Toothpicks
- Chocolate candy (optional)
- Halloween sprinkles (optional)
- Piping bag (optional)
- Vegetable shortening (if necessary)
Instructions:
Prepare Your Oreos
- Twist open the Oreos cookies.
- Place the end of the lollipop stick in the center of the cream filling.
- Carefully twist the cookie back together, sandwiching the lollipop stick inside.
Melt the White Chocolate
- In a microwave or double boiler, melt the white chocolate until it’s smooth and creamy. Don’t forget to stir the melted chocolate in increments and heat the candy melts according to package directions.
Dip the Oreos
- Holding the lollipop stick, dip the end of the Oreos into the melted white chocolate, ensuring they are evenly coated. Make sure to coat both sides!
- Use a small spoon or a piping bag to help with the coating if needed. If the chocolate is too thick, reheat it for about 30 more seconds so it thickens.
Create the Mummy Look
- Place the dipped Oreos on a baking sheet lined with parchment paper.
- While the chocolate is still wet, use a toothpick to create the mummy’s bandage or a textured ghost look.
- You can also fill a plastic bag with the white chocolate. Simply drip it from the bag and make zigzag patterns on the chocolate coating. Use the excess chocolate to do this!

Add the Eyes and Sprinkles
- Quickly place candy eyeballs on the top of the cookie back to create the mummy’s eyes.
- Optional: Sprinkle Halloween sprinkles over the chocolate to create a more festive look.
Let Them Set
- Allow the chocolate to set and harden by leaving the Oreo pops batch on the baking sheet. This should take about 15-20 minutes. Wait until they are completely dry.

Tips for the Perfect No-Bake Covered Oreos Ghost, Easy Halloween Treat
Dipping Your Oreo Pops
Dipping your Oreo pops in white chocolate is a crucial step in creating these delicious treats. The melted white chocolate serves as the mummy’s “bandages,” giving them their spooky appearance. To ensure success, here are some tips:
- If your melted chocolate is too thick, add a small amount of vegetable shortening to thin it out.
- Be gentle when you dip an oreo cookie pop in the white candy to avoid breaking them.
- If you’re new to dipping, practice with a few cookies to get the hang of it!
- When using a piping bag, snip a small hole at the end to control the chocolate flow and avoid “blobs.”
Adding the Finishing Touches to the Easy Oreo Cake Pops
- The eyes and sprinkles are what truly bring your mummy Oreo pops to life. These finishing touches make them look cute and spooky at the same time.
- Remember to work quickly when adding these elements, as the chocolate sets fast.
- Don’t forget to use a toothpick to dab some melted chocolate on the back of your pops to attach them to the lollipop sticks for added stability!
Storing Your Cute Halloween Oreos Pops
Once your Halloween Oreo pops are ready, you’ll want to store them properly to keep them fresh and ready for your Halloween party. Here’s how:
- Place your Oreo pops in an airtight container or wrap them individually in clear cellophane bags to keep them fresh.
- Store them in a cool, dry place away from direct sunlight.
Dipped Halloween Oreos Cookie Variations
- You can use a different type of chocolate candy melts to achieve vibrant colors for your mummy’s “bandages” or the ghost faces.
- If you don’t have candy eyeballs, you can use small dabs of melted chocolate or chocolate frosting to create the eyes.
- Get creative with different colored sprinkles to customize your white chocolate dipped oreos pops for various occasions.

Final Thoughts: No-Bake Halloween Oreo Ghost Pops
Halloween is all about sharing the fun and excitement with others. Snap some photos of your Halloween Oreo Ghost Pops and share them on your social media profiles.
And when you post your creation, be sure to include a Halloween-themed hashtag to join in on the spooky festivities.
Your friends and family will be amazed at how fun these treats are to make!
Halloween Oreo Ghost Pops are the cutest treat. It’s both delightful and an easy recipe to make!
Halloween Oreo Ghost Pops
These Halloween pops are a delightful twist on the classic Oreo cookie.
These treats feature Oreo cookies on lollipop sticks, covered in a layer of white chocolate and decorated to look like ghosts.
Ingredients
- Oreos cookies
- Lollipop sticks
- White chocolate candy melts
- Candy eyeballs
- Toothpicks
- Chocolate candy (optional)
- Halloween sprinkles (optional)
- Piping bag (optional)
- Vegetable shortening (if necessary)
Instructions
- Twist open the Oreos cookies.
- Place the end of the lollipop stick in the center of the cream filling.
- Carefully twist the cookie back together, sandwiching the lollipop stick inside.
- In a microwave or double boiler, melt the white chocolate until it's smooth and creamy. Don't forget to stir the melted chocolate in increments and heat the candy melts according to package directions.
- Holding the lollipop stick, dip the end of the Oreos into the melted white chocolate, ensuring they are evenly coated. Make sure to coat both sides!
- Use a small spoon or a piping bag to help with the coating if needed. If the chocolate is too thick, reheat it for about 30 more seconds so it thickens.
- Place the dipped Oreos on a baking sheet lined with parchment paper.
- While the chocolate is still wet, use a toothpick to create the mummy's bandage or a textured ghost look.
- You can also fill a plastic bag with the white chocolate. Simply drip it from the bag and make zigzag patterns on the chocolate coating. Use the excess chocolate to do this!
- Quickly place candy eyeballs on the top of the cookie back to create the mummy's eyes.
- Optional: Sprinkle Halloween sprinkles over the chocolate to create a more festive look.
- Allow the chocolate to set and harden by leaving the Oreo pops batch on the baking sheet. This should take about 15-20 minutes. Wait until they are completely dry.
Prepare Your Oreos
Melt the White Chocolate
Dip the Oreos
Create the Mummy Look
Add the Eyes and Sprinkles
Let Them Set
Notes
Dipping Your Oreo Pops
Dipping your Oreo pops in white chocolate is a crucial step in creating these delicious treats. The melted white chocolate serves as the mummy's "bandages," giving them their spooky appearance. To ensure success, here are some tips:
- If your melted chocolate is too thick, add a small amount of vegetable shortening to thin it out.
- Be gentle when you dip an oreo cookie pop in the white candy to avoid breaking them.
- If you're new to dipping, practice with a few cookies to get the hang of it!
- When using a piping bag, snip a small hole at the end to control the chocolate flow and avoid "blobs."
Adding the Finishing Touches to the Easy Oreo Cake Pops
- The eyes and sprinkles are what truly bring your mummy Oreo pops to life. These finishing touches make them look cute and spooky at the same time.
- Remember to work quickly when adding these elements, as the chocolate sets fast.
- Don't forget to use a toothpick to dab some melted chocolate on the back of your pops to attach them to the lollipop sticks for added stability!
Storing Your Cute Halloween Oreos Pops
Once your Halloween Oreo pops are ready, you'll want to store them properly to keep them fresh and ready for your Halloween party. Here's how:
- Place your Oreo pops in an airtight container or wrap them individually in clear cellophane bags to keep them fresh.
- Store them in a cool, dry place away from direct sunlight.
Dipped Halloween Oreos Cookie Variations
- You can use a different type of chocolate candy melts to achieve vibrant colors for your mummy's "bandages" or the ghost faces.
- If you don't have candy eyeballs, you can use small dabs of melted chocolate to create the eyes.
- Get creative with different colored sprinkles to customize your white chocolate dipped oreos pops for various occasions.
Get the scoop on more like this:
- Halloween Ghost Cheese Burger Recipe
- Halloween Pumpkin Punch Drink Recipe
- Halloween Pesto Deviled Egg Recipe
- Halloween Breadstick Bones Recipe