Onion Bagel Recipe | How to Make Homemade Bagels
Did you know that the perfect onion bagel recipe is not just about the topping? It’s about infusing the flavor throughout the dough.

I’m going to share my innovative recipe with you, letting you in on some insider baker’s secrets.
We’ll dive into the nitty-gritty of creating a bagel that’s not just coated in onions, but carries a deep, aromatic flavor in every bite.
You’ll learn how to mix, proof, shape, and bake your bagels to perfection. Here’s a hint: it’s not as hard as you might think.
So, let’s roll up our sleeves and get to it.
Gathering Your Ingredients
Before we delve into the baking process, let’s gather all the necessary ingredients for our homemade bagels.
This onion bagel recipe calls for a combination of purpose flour and bread flour to create a chewy, yet soft texture.
We’ll need active dry yeast to give our bagels that much-needed rise, and sugar to activate the yeast and add a subtle sweetness.
Salt is essential to balance the flavors.
A generous serving of minced onion and onion flakes will infuse our bagels with a delightful, savory punch.
Don’t forget the sesame seeds and poppy seeds for a crunchy topping that’s both visually appealing and tasty.
And of course, we can’t forget the cream cheese, the crowning glory that will make our bagels truly irresistible.
Understanding the Bagel Dough
Now that we’ve gathered our ingredients, let’s dive into understanding the bagel dough, a crucial step in our homemade onion bagel recipe.
First, combine your dry ingredients in a large bowl, ensuring the instant yeast is evenly distributed.
Using a mixer with a dough hook attachment, gradually add warm water while mixing at medium speed.
You’ll notice the bagel dough beginning to form. It should pull away from the sides of the bowl, transforming into a smooth ball.
If it’s too sticky, add a bit more flour until you achieve the right consistency. Once done, transfer the dough ball to a lightly floured work surface.
Here comes the creative part! Divide the dough into equal parts, ready to shape into our delicious onion bagels.
Understanding the bagel dough is truly an art; one that’s worth perfecting!
Preparing Fresh Onions
After mastering the dough, I’ll move on to tackling the fresh onions for our bagel topping.
This is where our homemade onion bagels start to take on the character of those real New York bagels we crave.

Selecting a fresh onion, I peel away the outer layer, revealing the crisp, juicy flesh underneath.
I’ll thinly slice this onion, ensuring each piece is uniform, to guarantee that each bite of our perfect bagel has the right balance of dough and topping.
These slices are lightly sautéed until they reach a beautiful golden brown, enhancing the flavor profile of our homemade bagels.
This small, yet critical step, separates typical bagels from good bagels, and is integral to our onion bagel recipe.
Essential Baking Tools
Having prepped our onions, it’s time to gather our essential baking tools to ensure the bagel-making process runs smoothly.
Folks, our homemade bagel recipe calls for some key equipment.
First, we’ll need an airtight container to store our onion powder, keeping it fresh and potent.
The bowl of a stand mixer is next on our list, as it’s the perfect tool to mix our ingredients and knead our dough efficiently.
A baking sheet lined with parchment paper is a must-have for baking our shaped bagel to perfection, while an egg wash will give it that shiny, golden surface we all crave.
Lastly, don’t underestimate the value of patience and time, crucial ‘tools’ allowing our dough to rise and develop flavor.
Let’s not forget, these tools aren’t just handy for bagels but a plethora of other bread recipes as well.
Mixing the Dough Components
In my kitchen, it’s time to roll up the sleeves and get down to the exciting part – combining all our dough’s ingredients.
I start by mixing the dough components. I grab a small bowl and pour in a bit of olive oil.
Then, I reach for my large mixing bowl. Into this, I meticulously measure out cups of whole wheat flour, ensuring each cup is level for consistency’s sake.
Next, I incorporate the olive oil into the flour, stirring steadily until the sides of the bowl start to clean themselves.
I then divide this ball of dough into equal pieces, each destined to become a delicious batch of bagels.
This process, I find, is a harmonious interplay of precision and creativity, as every detail contributes to the final taste and texture.
Incorporating the Onion Flavor
Moving on to the heart of our recipe, I’m ready to incorporate the much-awaited onion flavor into the homemade bagels.
You’ll need simple ingredients: fresh onions finely minced, a dash of olive oil, and a pinch of salt.
Sauté the onions until they caramelize, intensifying their flavor. Now, let’s return to our dough.
Shape each piece into the classic bagel shape, a round circle with a hole in the center.
Once all are shaped, they’re ready for a brief water bath.
This step is crucial to achieving that characteristic chewy texture we crave in a fresh bagel.
Then, sprinkle the caramelized onions on top before popping them into your preheated oven.
Bake until golden brown, and voila! You’ve just mastered an easy bagel recipe that’s bursting with onion flavor.
Kneading the Bagel Dough
After adding the caramelized onions to the dough, it’s time to get our hands dirty with kneading.
This step is vital in our original recipe to ensure our homemade bagels have the perfect texture.
I start by dusting a clean kitchen towel with flour and placing the dough on the lightly floured surface.
Using my palms and the heel of my hand, I begin kneading the bagel dough, pushing it away from me, then folding it back towards me.
Next, I turn to my trusty heavy-duty mixer. I switch to the dough hook attachment and set it to a low speed.
As the mixer does its magic, I add a generous dollop of sour cream.
I know the dough is ready when it springs back after being poked with my index finger.
First Dough Rise: Timing
Once I’ve finished kneading, it’s time for the dough’s first rise, a crucial step that’ll impact the texture of our homemade bagels.
I moisten the dough with warm water, seal it with plastic wrap, and set it aside at room temperature.
This first dough rise brings life to our onion bagel recipe, as the yeast awakens and begins to work its magic, causing the dough to expand.
In the meantime, I prepare a large pot of water, adding barley malt syrup, a touch of brown sugar, and a dash of baking soda.
These ingredients create a rich, flavorful bath that’ll transform our dough into golden, chewy bagels.
Shaping Your Bagels
Now that the dough has risen perfectly, it’s time to shape these bagels, a step that’ll define their final look and size.
To start shaping your bagels, lightly dust your hands with flour and gently flatten the dough.
Then, create a hole in the center, gradually widening it until the bagel is the right size.
Remember, they’ll expand when boiling, so consider the size of your pot.
Once shaped, place them in a warm place to rise again.
Before boiling, brush the top of the bagels with egg yolk mixed with a bit of water for a glossy finish.
Boil them in water mixed with coarse salt and garlic powder. Leftover bagels can be seasoned with a sprinkle of bagel seasoning.
Enjoy your homemade bagels!
Preparing the Boiling Solution
Having shaped and brushed our bagels, let’s move on to preparing the boiling solution that will give them their characteristic chewy texture and shine.
A large skillet is the best way to control the amount of water and its temperature. Here’s how I do it:
- I fill the skillet with just enough water to cover the bagels,
- heat it until it’s nearly boiling,
- then add a generous splash of maple syrup.
- The syrup, I’ve found, is the secret ingredient that gives the bagels that professional-looking gloss.
After sliding the bagels in, I let them boil for a few minutes on each side, then lift them out with a slotted spoon, allowing excess water to drip off onto a wire rack.
The Boiling Process Explained
In this step, I’ll explain why the boiling process is crucial for achieving the perfect homemade onion bagels.
It’s a method I adopted from New York City’s finest bagel bakers.
You’ll need equal parts water and patience. After placing your formed bagels into the boiling water, wait for the air bubbles to surface.
This takes – minutes and is a sign that your bagels are ready for the next step.
By using paper towels, gently pat them dry before transferring onto an aluminum foil-covered baking tray.
This process gives them that classic, chewy exterior.
For a unique twist, try smearing peanut butter on the foil for added flavor.
You can find all the required tools and ingredients through my affiliate links.
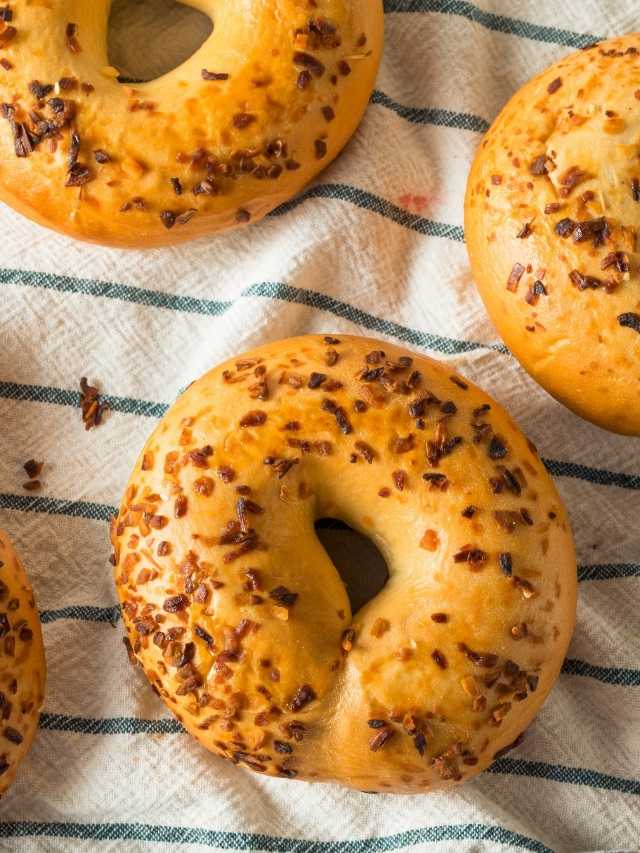
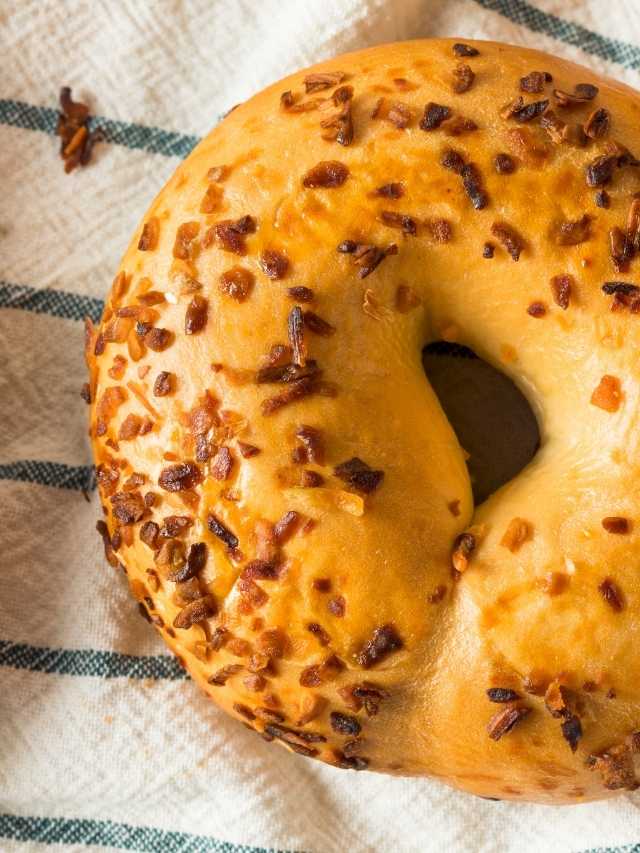
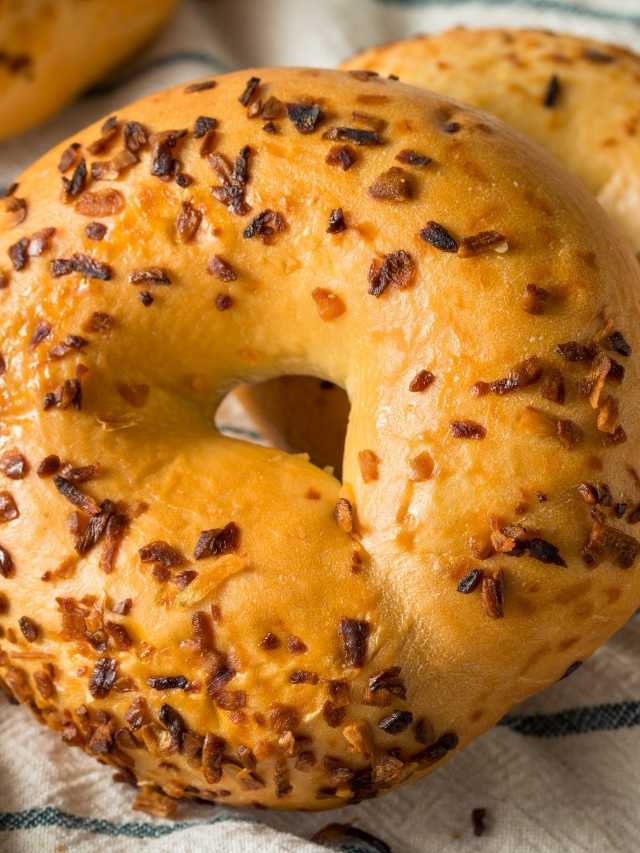
Adding the Onion Topping
After patting them dry, I’m sprinkling my boiled bagels with a generous layer of minced onion for a fragrant finish.
I favor the sharp, pungent aroma of fresh onions, but if you prefer a sweeter note, caramelized onions provide a delightful twist.
I pat the onions onto the bagels gently, ensuring the topping adheres well.
Now, for an extra crunch, I’m introducing a culinary innovation – a light dusting of onion flakes.
The dual onion texture creates a sensory delight, as the crisp flakes contrast beautifully with the soft, chewy bagel.
A quick return to the oven sets the topping and infuses the bagel with the onion’s essence.
This final touch transforms a regular bagel into an oniony sensation, ready to elevate your breakfast experience.
Preheating Your Oven
Before I get to baking, I’ll preheat my oven to 425°F to ensure a golden-brown finish on these onion bagels.
This isn’t just a random number, it’s the perfect balance that allows our bagels to bake without burning while achieving that appealing color and crispy crust.
As the oven warms up, I can feel the heat slowly enveloping the kitchen, a tangible promise of the deliciousness that’s yet to come.
Preheating is an essential step, folks. It helps activate the yeast and starts the baking process as soon as your bagels hit the rack.
Skipping this could lead to unevenly cooked or overly dense bagels, and we certainly don’t want that.
Baking the Onion Bagels
With the oven’s warmth now ready to embrace our doughy creations, it’s time to get these onion bagels baking.
I’ll now slide the parchment-lined baking tray into the oven, careful to place it in the center for an even bake.
You can almost hear the bagels sizzle as they meet their heated destiny.
I tend to rotate the tray halfway through the baking process, ensuring every bagel gets the perfect golden-brown touch.
The aroma wafts through the kitchen, the scent of baking bread mingling with the sharp yet sweet tang of onions.
After 20-25 minutes, my bagels emerge, their tops golden, their crusts perfectly crisp, their insides soft, yet chewy.
It’s a triumphant moment in any baker’s journey, and a testament to the magic of homemade goods.
Understanding the Baking Time
Usually, I bake my onion bagels for about 20-25 minutes to achieve a perfect balance of a crispy crust and a soft, chewy interior.
Baking time is crucial as it directly impacts the texture and taste of the bagels.
Bake them too long, and you’ll end up with bagels that are too hard.
On the other hand, under baking might result in doughy, undercooked centers.
But here’s where innovation kicks in: you can tweak the baking time to suit your preference.
Prefer them a bit crunchier? Add a few more minutes. Love softer bagels? Pull them out sooner.
It’s all about understanding your oven and monitoring the baking process closely.
Cooling Your Fresh Bagels
After I’ve perfectly baked my bagels, it’s crucial to let them cool down properly to preserve their texture and flavor.
This cooling process is no less important than the baking itself.
I gently transfer the freshly baked bagels onto a wire rack, allowing air to circulate and cool them evenly.
This step prevents the bottom from getting soggy, maintaining the bagels’ distinctive crispness.
It’s essential to exercise patience here. Pouncing on them too early will result in a gummy texture, which we don’t want.
I let them sit for at least 15 minutes. This period allows the starches to settle, enhancing their overall taste.
Once cooled, they’re ready to be sliced, toasted, or topped with your favorite spread.
This cooling method ensures a bagel experience like no other.
Storing Homemade Bagels
Once my bagels have cooled down, I focus on how to store them properly to maintain their freshness and flavor.
I’ve found that the key to keeping them fresh lies in airtight containers.
I place them in a sealable plastic bag, ensuring all the air is squeezed out before sealing.

If I’m planning to enjoy them within a few days, I keep the bag in a cool, dry place, away from direct sunlight.
For longer storage, I freeze them. Here, I wrap each bagel individually in a plastic wrap before placing them in a freezer bag.
This method prevents freezer burn and maintains the quality.
When I’m ready to indulge, I simply thaw them at room temperature or pop them in the toaster for a quick defrost and warm-up.
Tips for Perfect Bagels
I’ve learned a few tips and tricks over the years that I believe make all the difference in achieving perfect, homemade onion bagels.
First, always use high-gluten flour. It gives your bagels that ideal chewy texture we all crave.
Second, don’t rush the proofing process. Letting your dough rise properly is the key to a well-shaped bagel.
Third, boiling is essential. This step gives bagels their distinctive shiny crust.
For an innovative twist, add a little honey to the boiling water. It’ll impart a subtle, sweet undertone to your bagels.
Lastly, always bake your bagels on a high heat. It creates a golden, irresistible crust.
Follow these tips, and your homemade onion bagels will be a culinary triumph.
Common Bagel-Making Mistakes
While it’s easy to get excited about making your own onion bagels, it’s equally easy to make a few common mistakes that can throw off your recipe.
Not letting the dough rest long enough is a frequent error. This crucial step allows the gluten to develop, providing that characteristic bagel chewiness.
Overworking the dough, on the other hand, can result in tough bagels. A delicate touch is key!
Another pitfall is skimping on the boiling process. It might seem odd, but this is what gives bagels their distinct crust.
Lastly, don’t forget the onion topping! It’s tempting to be frugal, but a generous sprinkle is what elevates a mere bagel to an onion bagel delight.
Avoid these missteps and your bagels will be bakery-worthy.
Variations of Onion Bagels
After mastering the basic onion bagel recipe, you can start experimenting with various twists to make the bagels even more flavorful.
Try adding a sprinkle of poppy or sesame seeds on top for a bit of crunch.
Or, for an extra kick, mix in some garlic or jalapeño into the dough.
You could also switch up the type of cheese you use. Instead of the traditional cream cheese, consider using cheddar or gouda for a unique twist.
If you’re looking for a sweeter variation, try adding a touch of honey or maple syrup to the dough.
Each of these variations brings a distinct flavor profile to the table, allowing you to customize your bagel to fit your palate perfectly.
Serving Suggestions for Bagels
In my kitchen, there’s nothing better than serving a freshly baked bagel with a generous spread of cream cheese and a side of smoked salmon.
However, bagels offer a versatile canvas for a host of creative toppings.
For a savory brunch, I’d recommend a layer of ripe avocado, a splash of tangy feta, and a sprinkle of red chili flakes.
If you’re in the mood for something sweet, try a spread of almond butter, a drizzle of honey, and a handful of fresh berries.
As a late-night snack, a bagel topped with melted cheddar, crispy bacon, and a dollop of tangy barbecue sauce hits the spot.
Nutritional Information
Let’s dive into the nutritional breakdown of our homemade onion bagels.
Each bagel, packed with a hearty dose of onions, provides about 245 calories.
The majority of these calories come from carbohydrates, making up about 48 grams per bagel.
It’s these carbs that give you the energy you need to kick-start your day.
Protein-wise, you’re looking at approximately 9 grams. Not bad for a breakfast item!
Fat content is relatively low, with around 1.5 grams per bagel.
There’s also a good amount of dietary fiber, about 3 grams, which aids in digestion.
Lastly, don’t overlook the 2% daily value of calcium and iron each bagel brings.
All in all, these homemade onion bagels are a nutritious, satisfying choice for your morning meal.
Pairing Your Onion Bagels
My homemade onion bagel’s savory flavor pairs incredibly well with various spreads and toppings, creating a versatile meal for any time of the day.
The tantalizing taste of these bagels is greatly enhanced when accompanied by cream cheese, offering a smooth, tangy contrast to the robust onion flavor.
If you’re a fan of contrast, consider a sweet and savory combo; smear your bagel with a dollop of fig jam, creating an explosion of flavors that’ll leave your taste buds dancing.
If you’re vegan, don’t fret. Avocado spread works wonders, providing a creamy texture and a touch of freshness.
For a protein-packed option, top it with smoked salmon and a squeeze of lemon.
The possibilities are endless, limited only by your culinary creativity.
Homemade Bagel Recipe Recap
After experimenting with all those fantastic toppings on our homemade onion bagels, I’d like to circle back to the recipe itself and give a brief recap.
We started with a simple dough mix, letting the yeast, warm water, and sugar interact to produce a bubbly concoction.
We then added the flour, salt, and a generous helping of finely chopped onions.
There’s a real art to kneading the dough just right, letting the gluten develop for that perfect chewy texture.
After forming our bagels, we plunged them into a boiling water bath infused with honey, a step that gives the bagels their unique glossy finish.
Then came the baking, transforming our dough rings into fragrant, golden brown bagels.
The result? A homemade onion bagel that’s wonderfully satisfying to bite into.
Reader’s Bagel-Making Experiences
In reflecting on the bagel-making process, I’ve received numerous stories from readers about their own experiences.
One reader experimented with different types of flour, discovering that a blend of whole wheat and white flour resulted in a more robust flavor.
Another shared how adding a touch of honey to the boiling water imparted a subtle sweetness to their bagels.
A third reader ventured into the realm of innovation, incorporating sun-dried tomatoes and fresh basil into their dough for a Mediterranean twist.
These experiences highlight the beauty of homemade bagels: the freedom to innovate and personalize.
Tips to Remember About Onion Bagel Recipe
So, there we’ve it – making homemade onion bagels isn’t as daunting as it might seem.
With fresh ingredients, a little patience, and the right tools, you’re all set to create your very own bakery-worthy bagels.
Remember, it’s all about understanding the dough and perfecting the mix.
Don’t forget to share your bagel-making experiences and enjoy these delicious treats with your favorite pairings.
Happy baking!
Onion Bagel Recipe
Did you know that the perfect onion bagel is not just about the topping? It's about infusing the flavor throughout the dough.
Ingredients
- Onions
- Olive oil
- Salt
- All purpose flour
- Bred flour
- Dry yeast
- Onion flakes
- Sesame seeds and poppy seeds
- Cream cheese
Instructions
Understanding the Bagel Dough
First, combine your dry ingredients in a large bowl, ensuring the instant yeast is evenly distributed.
Using a mixer with a dough hook attachment, gradually add warm water while mixing at medium speed.
You'll notice the bagel dough beginning to form. It should pull away from the sides of the bowl, transforming into a smooth ball.
If it's too sticky, add a bit more flour until you achieve the right consistency. Once done, transfer the dough ball to a lightly floured work surface.
Divide the dough into equal parts, ready to shape into our delicious onion bagels.
Preparing Fresh Onions
After mastering the dough, I'll move on to tackling the fresh onions for our bagel topping.
This is where our homemade onion bagels start to take on the character of those real New York bagels we crave.
Selecting a fresh onion, I peel away the outer layer, revealing the crisp, juicy flesh underneath.
I'll thinly slice this onion, ensuring each piece is uniform, to guarantee that each bite of our perfect bagel has the right balance of dough and topping.
These slices are lightly sautéed until they reach a beautiful golden brown, enhancing the flavor profile of our homemade bagels.
This small, yet critical step, separates typical bagels from good bagels, and is integral to our onion bagel recipe.
Mixing the Dough Components
In my kitchen, it's time to roll up the sleeves and get down to the exciting part - combining all our dough's ingredients.
I start by mixing the dough components. I grab a small bowl and pour in a bit of olive oil.
Then, I reach for my large mixing bowl. Into this, I meticulously measure out cups of whole wheat flour, ensuring each cup is level for consistency's sake.
Next, I incorporate the olive oil into the flour, stirring steadily until the sides of the bowl start to clean themselves.
I then divide this ball of dough into equal pieces, each destined to become a delicious batch of bagels.
Incorporating the Onion Flavor
Moving on to the heart of our recipe, I'm ready to incorporate the much-awaited onion flavor into the homemade bagels.
You'll need simple ingredients: fresh onions finely minced, a dash of olive oil, and a pinch of salt.
Sauté the onions until they caramelize, intensifying their flavor. Now, let's return to our dough.
Shape each piece into the classic bagel shape, a round circle with a hole in the center.
Once all are shaped, they're ready for a brief water bath.
This step is crucial to achieving that characteristic chewy texture we crave in a fresh bagel.
Then, sprinkle the caramelized onions on top before popping them into your preheated oven.
Preheat my oven to 425°F to ensure a golden-brown finish on these onion bagels.
After 20-25 minutes, my bagels emerge, their tops golden, their crusts perfectly crisp, their insides soft, yet chewy.
Get the scoop on more like this:
- New Orleans Style Camellia Red Beans and Rice Recipe
- Best Soft Sprinkle Sugar Cookies Recipe
- Easy Chocolate Brownie Recipe With Cream Cheese Frosting
- Best Cinnamon Poached Pears Recipe