Easy Copycat Chocolate Cake Pops Starbucks Recipe

Got a sweet tooth but an empty wallet? Our copycat Chocolate Cake Pops Starbucks recipe is a delightfully delicious solution!
If you could recreate Starbucks’ chocolate cake pops at home, anytime you crave them, wouldn’t you?
You’re in luck! I’ll guide you step-by-step to whip up your own delicious, copycat version.
We’ll be blending, baking, shaping, and dipping, creating cake pops as perfect as Starbucks’.
So get your apron ready. Here’s the scoop of our easy copycat Chocolate Cake Pops Starbucks recipe.
Understanding the Basics of Cake Pops
You’ll need to grasp the basics of making cake pops before you can recreate the Starbucks version at home.
The chocolate cake pops Starbucks recipe involves simple ingredients and specific culinary techniques that you’ll master with time.
The main elements of the cake pop recipe are a moist cake mixture and chocolate candy melts.
The key to homemade cake pops is to crumble the baked cake finely and blend it with a creamy binder until it holds a ball shape.
You’ll then dip these spheres into the melted chocolate using cake pop sticks.
The steps may seem intricate, but once you’ve nailed the basics, you can produce countless copycat Starbucks cake pops.
It’s the perfect way to satisfy your Starbucks chocolate cake pops cravings and impress others with your Starbucks copycat recipes.

Gathering the Necessary Ingredients
Before you start, it’s crucial to have all the required ingredients on hand. The Starbucks chocolate cake pops recipe calls for a box of chocolate cake mix.
You’ll bake it, crumble it, and mix it with chocolate frosting to create the cake balls.
You’ll also need lollipop sticks to skewer each ball before dipping into the melted chocolate. The candy coating gives your homemade chocolate cake pops that desired glossy finish.
Once dipped, you’ll set them on parchment paper to harden.
Storing the cake pops in an airtight container keeps them fresh. This process, although seemingly intricate, is quite straightforward.
With precision and care, you’ll master the art of making these delightful treats.
Preparing the Chocolate Cake Base
It’s time to focus on creating the base for your sweet treats, which begins by following the instructions on our printable recipe card or a boxed mix to bake a moist and fluffy dessert.
You’ll need a large mixing bowl to combine the boxed cake mix with the specified amount of water, eggs, and oil.
Don’t forget to add a dash of vanilla extract to the cake batter for an extra burst of flavor.
For chocolate lovers, preparing the chocolate cake base means baking a moist chocolate cake that melts in your mouth.
Remember these key steps:
- Pour the cake batter into a greased baking sheet.
- Let the cake cool completely before proceeding.
- Crumble the cooled cake back into the large bowl.
This process ensures that your cake pops start from a perfect, crumbly texture.

Crafting the Perfect Frosting Mixture
Now that the base is ready, let’s shift your attention to crafting the perfect frosting mixture.
You’ll need a simple vanilla frosting, cream cheese, and a bit of vegetable oil.
Start by grabbing your medium bowl. It’s important to separate your wet ingredients from your dry ingredients, so let’s begin with the wet.
Pour the vegetable oil into the bowl, then add the cream cheese. Beat them together with a paddle attachment until you achieve a smooth consistency.
Next, slowly add in the simple vanilla frosting. You’re creating a sweet treat here, so don’t worry about too much frosting.
Any leftover cake can be used for more cake pops!
Keep this recipe card handy, you’ll be referring to it often as you perfect your technique.
Shaping Your Cake Pop Balls
You’re ready to start shaping those delightful little balls from your cake and frosting mixture.
Grab your small cookie scoop and let’s dive into the simple steps of shaping your cake pop balls.
- Scoop up a good amount of cake crumbs mixture and compress it lightly to form a ball.
- Place each ball onto a cookie sheet lined with parchment paper.
- Repeat until all the mixture has been used up.
Your own cake pops should look like tiny Starbucks birthday cake pops at this stage.
To keep your moist cake pops from losing their shape, pop them into a freezer-safe container. Store them in the freezer, but not a cardboard box, to maintain their freshness.
Cake pop making can be pretty fun, right?
Setting Your Cake Pop Balls: Tips and Tricks
Before moving onto decorating, there’s a crucial step in your baking journey that can’t be skipped – setting your cake pop balls properly.
Firstly, wrap your delicious cake crumbles using plastic wrap and let them rest at room temperature. This will ensure the bite-sized treats maintain their shape.
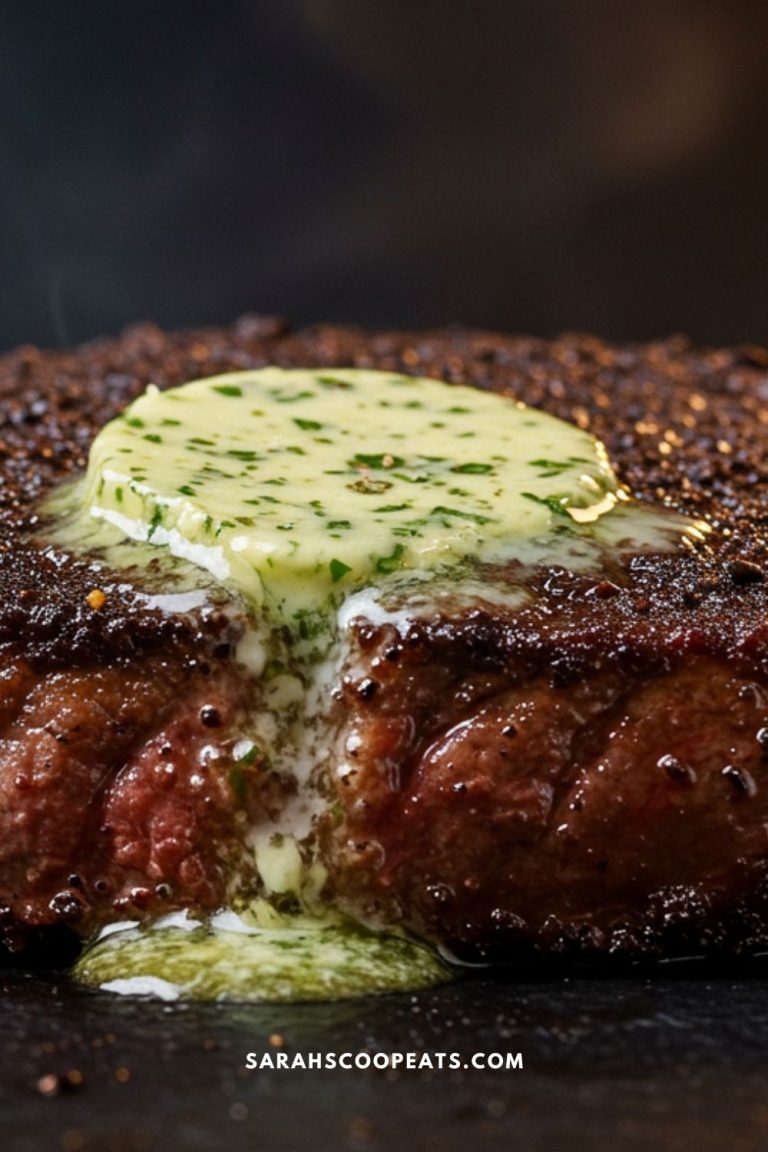
Next, melt your chocolate coating in a microwave-safe bowl or a double boiler, keeping a close eye to avoid burning.
With a lollipop stick, carefully dip each ball into the chocolate and place them on a Styrofoam block. The block will hold the cake pops upright, allowing the chocolate coating to set evenly.

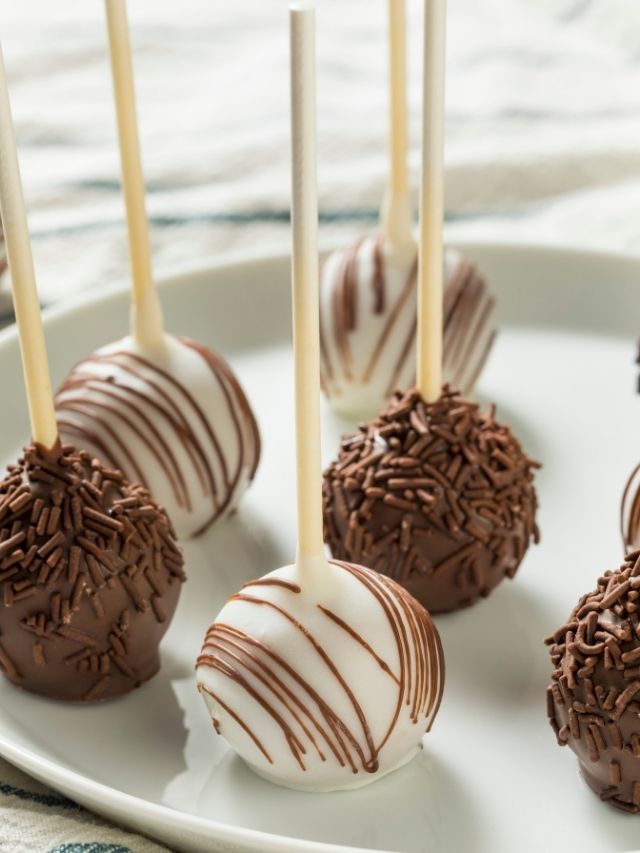
Dipping and Decorating Your Cake Pops
Once your tiny treats are set and firm, it’s time to add some fun and flavor by dipping and decorating them.
Melt your choice of dark chocolate, milk chocolate, white chocolate, almond bark, or candy melts in a separate bowl. Cocoa butter or vegetable oil can be added to thin the consistency for easier coating.
- Dip each pop into the melted candy melts, gently shaking off the excess chocolate.
- Roll them in white sprinkles for an enticing crunch, or drizzle with contrasting melted chocolate for a gourmet touch.
- Insert the decorated pops into a block of Styrofoam to hold them upright while they set.
Properly Storing Your Cake Pops
After all that decorating fun, it’s crucial to know how to store your sweet treats to keep them fresh and delicious.
Using the chocolate cake pops Starbucks recipe: an easy to make copycat, you’ve created a tasty treat perfect for a birthday party, baby shower, or other special occasions.
To keep these rich cake delights fresh, properly storing your cake pops is key.
Firstly, ensure they’ve cooled completely. Then, place them in an airtight container. You can layer them with parchment paper to prevent sticking.
Store at room temperature if you’ll be serving them soon. If not, they can be refrigerated for up to a week.
When it’s time to satisfy that sweet tooth, pair your cake pop with a cup of coffee, reminiscent of your favorite coffee shop. It’s like biting into a piece of chocolate chips rich cake heaven.
Essential Tips for Perfect Cake Pops Every Time
You’ll find these essential tips invaluable in achieving perfect sweet treats every time you get creative in the kitchen, especially with the popular choice of the chocolate cake pops Starbucks recipe.
It’s easy to make copycat versions of these delectable delights, but the best results come from understanding the process.
- Firstly, melt your chocolate in second increments, not all at once, to ensure a smooth, glossy finish.
- Secondly, when attaching your cake ball to the stick, dip the stick in a little chocolate first. This adhesive trick will hold your cake pops securely.
- Lastly, remember to poke small holes in your cake pops before dipping them in chocolate. It’ll prevent them from cracking.
Exploring Variations of the Starbucks Chocolate Cake Pop Recipe
Exploring variations on that popular sweet treat can open up a world of creative opportunity in the kitchen, letting you put your own unique spin on the classic delight.
If your coating keeps cracking, the coating is too hot for the cold cake balls. Next time let the coating sit just 5 more minutes, then try again.
You might start by swapping the standard coating for pink candy melts, a great way to customize for baby showers or birthday parties.
You’ll find that microwaving in 30-second intervals, stirring between, is key to achieving a smooth, even consistency.
Don’t be afraid to experiment with other color variations too! Remember, the key is to melt the candy in 30-second increments, ensuring it doesn’t burn.
With a little practice, you’ll master the technique and find the best way to turn out beautifully decorated cake pops that are sure to impress your guests.
Your creativity is the only limit here.

Food for Thought
There you’ve it – your very own Starbucks-style chocolate cake pops! Easy to make, these delightful treats are perfect for parties or just to satisfy your sweet tooth.
Remember, practice makes perfect, so don’t be disheartened if your first batch isn’t absolutely perfect. Experiment with different flavors and decorations.
Chocolate Cake Pops Starbucks recipe
The most delicious homemade chocolate cake recipe, the most decadent chocolate frosting, smoothly coated and decorated to fit your personal whims... honestly, this copycat Chocolate Cake Pops Starbucks recipe may blow Starbucks out of the water.
Ingredients
Chocolate Cake
- 1 cup all-purpose flour, leveled
- 1 cup sugar
- 6 tbsp unsweetened cocoa powder
- 1/2 tsp baking soda
- 1/4 tsp salt
- 2 large eggs, at room temperature
- 1/2 cup canola oil
- 1 tsp pure vanilla extract
- 1/2 cup hot water
Chocolate Frosting
- 6 tbsp unsalted butter, room temperature
- 3/4 cup powdered sugar
- 1/2 cup unsweetened cocoa powder
- 2-3 tsp heavy cream or milk
- 1/2 tsp pure vanilla extract
Cake Pop Coating
- 32 ounces candy melts
- (or) 32 ounces pure chocolate + 1/2 tsp vegetable oil
- sprinkles
Instructions
Preparation
- Preheat oven to 350°F. Grease your cake pan.
Making the Cake
- Whisk the dry cake ingredients together in a large bowl. Set aside.
- Whisk the oil, eggs, and vanilla together in a medium bowl.
- Pour the wet ingredients into the dry ingredients, add the hot water, and whisk everything together until well combined.
- Pour the batter evenly into the prepared pan.
- Bake for 25-27 minutes or until a toothpick comes out clean.
- Allow the cake to cool completely in the pan set on a wire rack.
Making the Frosting
- With a mixer fitted with a paddle attachment, beat the butter on medium until creamy, about 2 minutes. Expect to scrape down the sides of the bowl with a rubber spatula repeatedly.
- Add powdered sugar, cocoa powder, 2 tsp of heavy cream/milk, and vanilla with the mixer running on low.
- Increase to high and beat for 3 minutes until it really comes together. Add another tsp of milk/cream if it looks a little too thick.
Making the Cake Pops
- Crumble the cooled cake into the frosting bowl, ensuring no large lumps.
- Turn the mixer on low and beat the frosting and cake crumbles together until combined.
- Measure 1 tbsp of moist cake mixture and roll into a small ball.
- Place balls on a lined baking sheet. Refrigerate for 2 hours or freeze for 1 hour.
- If using candy melts, melt the coating, preferably in a 2-cup liquid measuring cup (best for dunking!). Use a microwave or a double boiler, pouring some at a time into the liquid measuring cup.
- Let the coating cool down for a few minutes before you begin dipping. If it’s too hot when you dip, the coating will crack.
- If using chocolate, chop into even pieces no larger than 1/2" squares.
- Melt 2/3 of the chocolate in a microwave or a double boiler with the vegetable oil, stirring often, until it reaches 115°F for dark chocolate or 110°F for milk or white chocolate.
- Add the remaining 1/3 of the chocolate to the melted chocolate and stir until smooth.
- Return the chocolate to the bowl and stir until it reaches 90°F for dark chocolate or 86°F for milk or white chocolate. It must stay at this temp to be tempered as a coating.
- Remove only 2-3 cake balls from the refrigerator at a time. (Keep the rest cold!)
- Dip a lollipop stick about 1/2" into the coating, then insert into the center or the cake ball. Only push it about halfway, no more than 2/3, through the cake ball.
- Dip the cake ball into the coating until it is completely covered. The coating should cover the base of the cake ball where it meets the lollipop stick.
- Very gently tap the stick against the edge of the measuring cup to allow excess coating to drop off.
- Decorate the top with sprinkles and place upright into a styrofoam block or box with prepared holes.
- Repeat with remaining cake balls, only working with some out of the refrigerator at a time. The cake balls must be very cold when dipping!
Serving
- Coating will set within an hour. Store cake pops in the refrigerator for up to a week.
Notes
- Make things ahead of time! I make the cake the day before, covered and kept at room temperature. Store undipped cake balls in the fridge for up to 2 days or freeze them for up to 6 weeks, just make sure you thaw them in the fridge before use.
- Freeze finished cake pops for up to 6 weeks once the coating has fully set.
- If your coating keeps cracking, it is too hot. Let it sit 5 more minutes and try again.
- Skip the stick and just dip the cake balls in tempered chocolate to make delicious chocolate cake truffles. Whenever I dip truffles, I always use a special spiral dipping tool.
- Always use oil with chocolate cake. Butter is wasted on chocolate cake because it is always overpowered by the cocoa.
- If I could afford it, I'd always dip in tempered chocolate, but candy melts make FORTY cake pops way more affordable!
- Don't be tempted to make the cake balls bigger. Bigger means heavier, which means a mess after overpowering the little lollipop stick.
With a little creativity, you can make your cake pops even more unique and delicious than the ones in Starbucks. Happy baking!
Get the scoop on more like this: